
Ever wonder how to dye Easter eggs that look straight out of Pinterest? Whether you want bold and vibrant colors, chic metallic designs, or eco-friendly natural dyes, we’ve got the ultimate guide to making your Easter eggs unforgettable!
Dyeing Easter eggs is a timeless tradition that brings creativity, fun, and vibrant color to holiday celebrations.
In this guide, you’ll learn how to dye Easter eggs step by step, along with creative and unique Easter egg dyeing ideas to make your eggs stand out. From classic food coloring techniques to natural Easter egg dyes and trendy designs like marbled tie-dye, and gold-leaf eggs. There’s something for everyone, from beginners to egg-dyeing pros.
Looking for kid-friendly or eco-friendly methods? We’ve got you covered! Plus, we’ll share expert tips and troubleshooting hacks to help you achieve perfect, beautifully dyed eggs every time.
Let’s get started with the ultimate guide to DIY Easter eggs that will make your holiday extra special!
Disclosure: Some of the links in this post are ‘affiliate links’. This means if you click on the link and purchase the item, I will receive an affiliate commission.
- How to Dye Easter Eggs: Step-by-Step Guide
- 7 Unique & Creative Easter Egg Dyeing Techniques
- 1. Marbled Easter Eggs (Shaving Cream or Whipped Cream Method)
- 2. Natural Easter Egg Dyes (Eco-Friendly & Kid-Safe)
- 3. Ombre-Dipped Easter Eggs (Gradient Effect)
- 4. Tie-Dye Easter Eggs (Paper Towel Method)
- 5. Speckled Easter Eggs (Rustic Farmhouse Look)
- 6. Gold Leaf & Metallic Easter Eggs (Chic & Elegant)
- 7. Foliage Imprinted Easter Eggs (Botanical & Elegant)
- Easter Egg Dyeing FAQs & Troubleshooting
- Pin & Share These Ideas for Your Easter Celebrations!
How to Dye Easter Eggs: Step-by-Step Guide
Dyeing Easter eggs is easier than you think! With just a few simple ingredients, you can create beautifully colored eggs perfect for Easter celebrations. Follow this step-by-step guide to achieve vibrant, smooth, and long-lasting colors.
Supplies You’ll Need:
- White eggs (hard-boiled or blown-out)
- ½ cup boiling water per color
- 1 tsp white vinegar per color
- 10-20 drops of food coloring (gel or liquid)
- Cups or bowls for dyeing
- Spoons or tongs
- Paper towels or cooling rack
- Step 1: Prepare the Eggs
- Hard-boil eggs by placing them in a pot of cold water, brought to a boil and simmered for 9-12 minutes.
- Transfer eggs to an ice bath and let them cool completely before dyeing.
- Step 2: Mix Your Dye
- In a cup or bowl, mix ½ cup boiling water, 1 tsp vinegar, and 10-20 drops of food coloring.
- Adjust dye intensity by adding more food coloring for deeper shades.
- Step 3: Dye the Eggs
- Use a spoon or tongs to gently submerge each egg in the dye.
- Let eggs sit for 5-10 minutes, depending on how bold you want the color.
- For two-tone or ombré effects, dip only part of the egg at a time.
- Step 4: Dry & Shine
- Place eggs on a drying rack or paper towels to air-dry completely.
- Rub eggs with a small amount of vegetable oil for a glossy finish.
Pro Tip: Want extra vibrant colors? Let eggs soak in the dye for longer!
Now that you have the basic steps, let’s explore 7 creative and unique Easter egg dyeing ideas to take your eggs to the next level!
7 Unique & Creative Easter Egg Dyeing Techniques
Looking for fun and creative Easter egg dyeing ideas? These techniques go beyond traditional methods, giving you unique Easter egg decorating ideas that are easy, vibrant, and perfect for all ages. Whether you’re after Pinterest-worthy eggs, eco-friendly dyes, or bold designs, these DIY Easter egg ideas will make your holiday extra special!
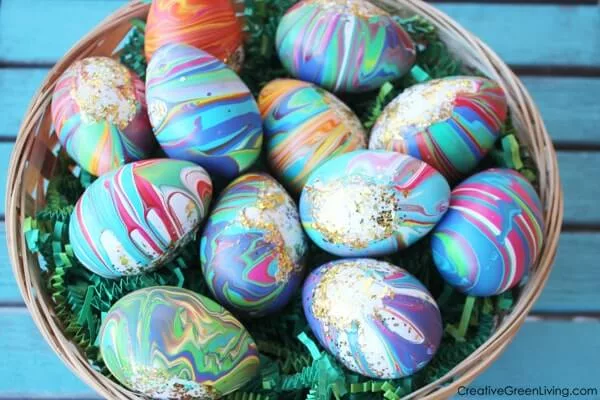
1. Marbled Easter Eggs (Shaving Cream or Whipped Cream Method)
Marbled Easter eggs create a mesmerizing swirled, marble effect with dreamy colors. They’re super easy, mess-free, and produce stunning pastel or bold designs. The best part? No two eggs look the same!
You’ll Need:
- Shaving cream or whipped cream
- Food coloring (multiple colors)
- A shallow dish
- Toothpick or skewer
- Gloves (optional)
How to Do It:
- Fill a shallow dish with shaving cream or whipped cream.
- Add drops of food coloring in various spots.
- Use a toothpick to swirl the colors into a marbled pattern.
- Roll each egg through the mixture until fully coated.
- Let sit for 10 minutes, then wipe clean with a paper towel.
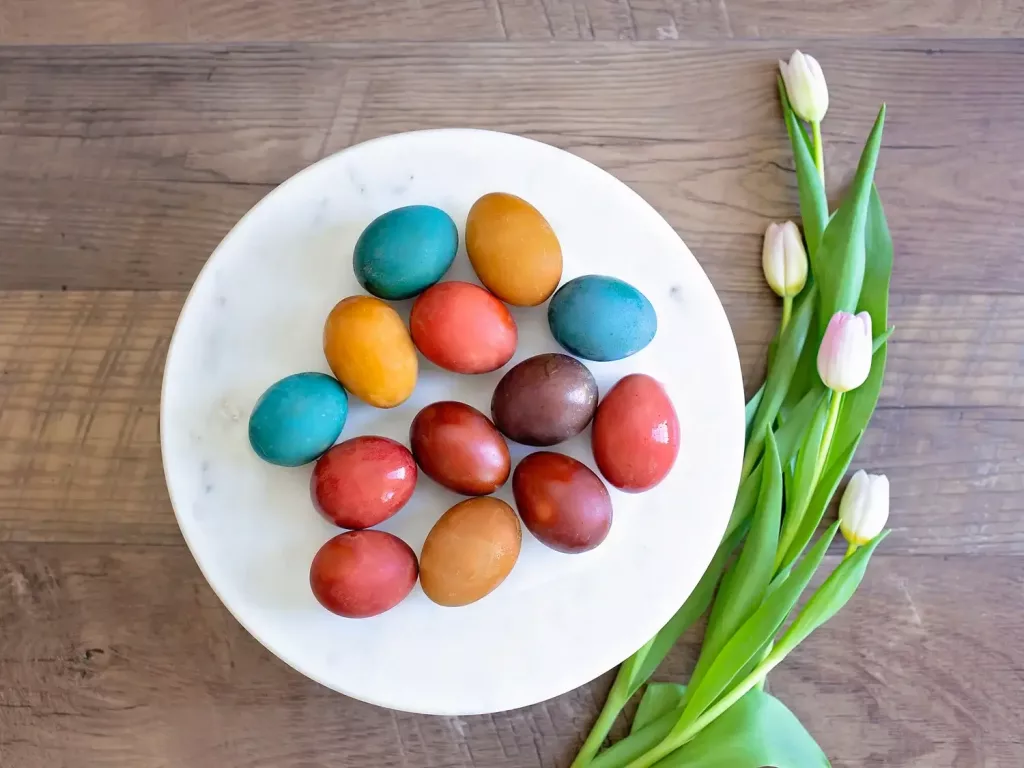
2. Natural Easter Egg Dyes (Eco-Friendly & Kid-Safe)
Dye eggs naturally by using fruits, vegetables, and spices.
Perfect for kids and eco-conscious decorators, this method uses all-natural ingredients to create beautiful, earthy tones without artificial dyes.
Natural Dye Colors:
- Yellow: Turmeric (2 tbsp per cup of water)
- Blue: Red cabbage (chopped, boiled in water)
- Pink: Beets (chopped, boiled in water)
- Green: Spinach (boiled in water)
- Orange: Onion skins (boiled in water)
How to Do It:
- Simmer 2 cups of water with the chosen ingredient for 20-30 minutes.
- Strain the dye into a bowl and add 1 tbsp vinegar.
- Submerge eggs in the dye and let sit for 30 minutes or overnight.
- Remove and dry on a rack.
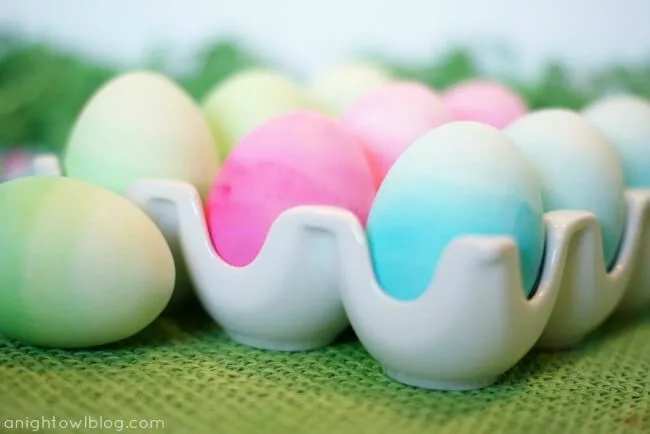
3. Ombre-Dipped Easter Eggs (Gradient Effect)
Ombre eggs achieve a smooth color fade to create a fun and elegant look. Chic, modern, and perfect for Easter decor, they add a trendy, minimalist touch to your holiday display.
You’ll Need:
- Food coloring
- Vinegar
- Water
- A deep cup or jar
How to Do It:
- Mix your dye bath (½ cup water, 1 tsp vinegar, food coloring).
- Dip the egg partway into the dye, holding it for 2-3 minutes.
- Lower the egg further every few minutes for a smooth gradient effect.
- Let dry on a rack.
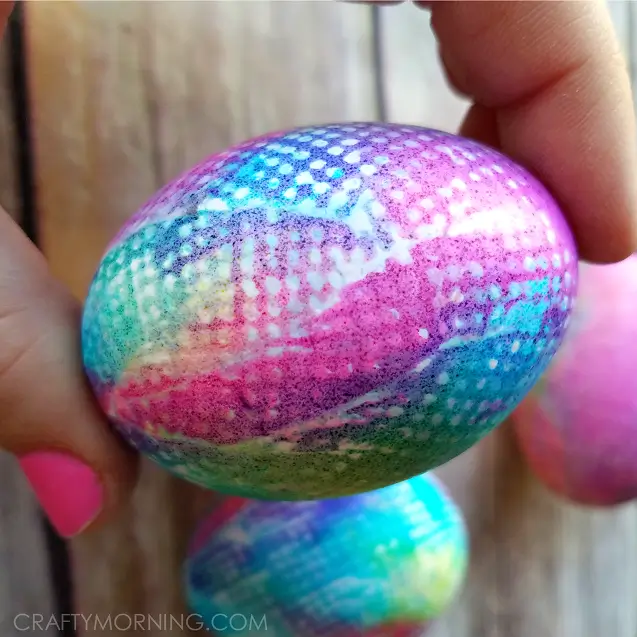
4. Tie-Dye Easter Eggs (Paper Towel Method)
Tie-dye Easter eggs are bright, colorful, and fun for kids ( and adults) plus, each one is unique! This kid-friendly, mess-free technique creates bold, tie-dye patterns with just food coloring and paper towels.
You’ll Need:
- Paper towels
- Food coloring
- Spray bottle with vinegar
- Gloves (optional)
How to Do It:
- Wrap each egg in a paper towel.
- Drip different food coloring onto the towel.
- Spray the entire egg with vinegar to spread the colors.
- Let sit for 10 minutes, then unwrap and dry.
5. Speckled Easter Eggs (Rustic Farmhouse Look)
Speckled Easter eggs add a soft, speckled finish for a natural, farmhouse-style effect. These charming, rustic eggs are inspired by nature, making them a great choice for neutral Easter decor.

You’ll Need:
- Food coloring or natural dyes
- White or brown eggs
- A small cup of rice
- Gloves (optional)
How to Do It:
- Place uncooked rice in a small cup.
- Add a few drops of food coloring and shake to coat the rice.
- Place an egg inside the cup and gently shake.
- Remove and let dry.
6. Gold Leaf & Metallic Easter Eggs (Chic & Elegant)
Gold leaf Easter eggs turn your holiday decor into luxurious, high-end pieces with metallic accents. Elegant and Pinterest-worthy, they add a touch of glam to your Easter celebrations—perfect for centerpieces!

You’ll Need:
- Gold or silver leaf sheets
- Adhesive (Mod Podge or edible glue)
- Soft paintbrush
How to Do It:
- Dye the eggs first for a colorful base.
- Apply a thin layer of glue where you want the gold leaf.
- Gently press gold leaf sheets onto the egg.
- Use a soft brush to smooth and remove excess flakes.
These are perfect for creating elegant centerpieces and if you’re looking for more stunning ways to Beautifully Display Your Dyed Eggs, our guide has you covered.
7. Foliage Imprinted Easter Eggs (Botanical & Elegant)
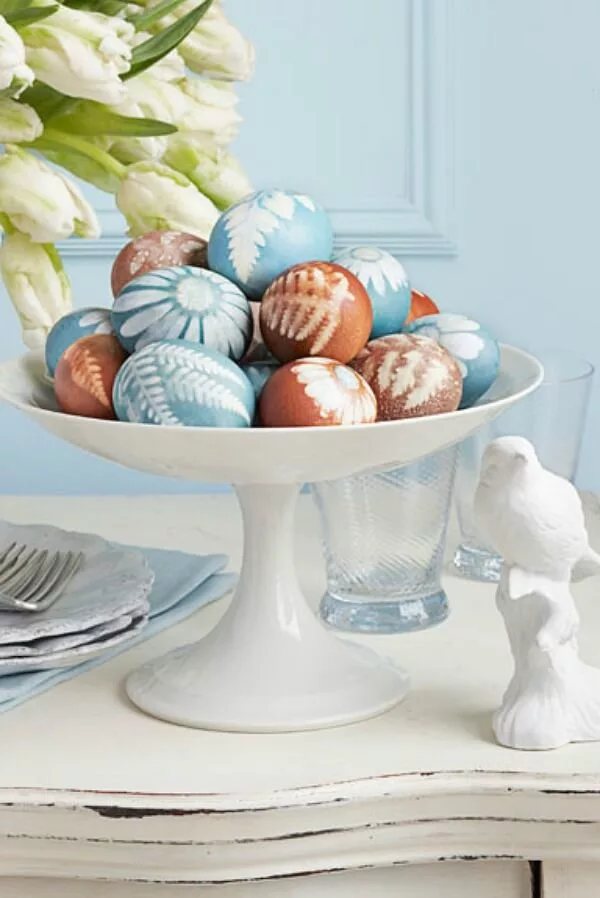
Foliage imprinting is a stunning way to decorate Easter eggs using real leaves, flowers, or herbs. This nature-inspired method creates delicate, intricate patterns and is perfect for a rustic, farmhouse, or botanical-themed Easter display.
You’ll Need:
- White eggs (hard-boiled or blown-out)
- Small leaves, flowers, or herbs (such as parsley, ferns, or clover)
- Pantyhose or cheesecloth (to hold the foliage in place)
- Food coloring or natural dyes
- Vinegar
- Scissors & rubber bands
How to Do It:
- Press a leaf or flower flat against the egg.
- Wrap the egg tightly in a piece of pantyhose or cheesecloth and secure it with a rubber band.
- Prepare your dye bath (½ cup boiling water, 1 tsp vinegar, and food coloring or natural dye).
- Submerge the wrapped egg into the dye for 10-20 minutes, depending on color intensity.
- Remove from the dye, cut away the pantyhose, and carefully peel off the foliage to reveal the imprint.
- Let the eggs dry completely before displaying.
Looking for more beautiful Easter decorations? Check out our guide on 17 Simple Easter Decorations for the Perfect Spring Home!
Easter Egg Dyeing FAQs & Troubleshooting
Easter egg dyeing can sometimes come with a few questions or challenges. Here, we’ve compiled answers to the most common Easter egg dyeing FAQs to help you troubleshoot any issues and get the best results for your holiday eggs!
Q1: How can I make my Easter egg dye colors brighter?
To achieve brighter and more vibrant colors, use more food coloring in your dye mixture and allow the eggs to soak for a longer period. For the best results, let the eggs sit in the dye for 15-30 minutes instead of the usual 5-10 minutes. For deep, rich colors, consider using gel food coloring, which provides more intense hues compared to liquid.
Q2: My Easter eggs are getting cracked. How do I prevent this?
To avoid cracked eggs, handle them gently during the boiling process and while dyeing. Be sure the eggs are completely cooled before dyeing—this helps prevent cracks caused by sudden temperature changes. Also, avoid using old eggs, as their shells can be more fragile. If you’re using blown-out eggs for decorating, use care when poking holes and be gentle when cleaning.
Q3: How can I get a smooth, even color on my Easter eggs?
To ensure an even coat of dye, follow these tips:
For two-tone designs, make sure the initial color layer is completely dry before adding a second layer of dye to avoid mixing colors.
Stir the dye before using it to evenly distribute the color.
Use a spoon or tongs to dip the egg in the dye, making sure it’s fully submerged.
If using a paper towel method (tie-dye or ombre), be sure to gently press the paper towel around the egg to avoid uneven spots.
Q4: Can I reuse the dye for multiple eggs?
Yes! You can reuse dye for multiple eggs, but the colors may become lighter with each use. If you plan to dye several eggs with the same color, it’s best to prepare fresh dye mixtures after every few eggs for the brightest results. For natural dyes, the solution may lose its potency faster, so it’s ideal to dye eggs in smaller batches.
Q5: My eggs have splotches or streaks. How can I fix this?
Splotches or streaks may occur if the dye is not applied evenly or if it’s too thick. To fix this, try the following:
If using natural dyes, the colors may not be as uniform as synthetic dyes, which can add a rustic, natural look to your eggs.
Dip eggs for a longer time to allow the dye to fully cover the surface.
For uneven splotches, use a clean brush to gently apply dye to the affected areas and smooth out the color.
Q6: How do I make my eggs shiny after dyeing them?
To give your eggs a smooth, glossy finish, use a small amount of vegetable oil or baby oil. Simply dip a paper towel in the oil and gently rub it over the dried eggs. This will add shine and make the colors pop! Avoid using too much oil, as it can cause streaking.
Q7: How do I store my dyed Easter eggs?
Once your Easter eggs are dyed and dried, store them in a cool, dry place. To keep them fresh for longer, place the eggs in the refrigerator if you plan on eating them. If they’re purely for decoration, make sure they’re in a spot where they won’t get damaged, and enjoy them as long as possible!
By following these tips, you’ll have perfectly dyed Easter eggs that will impress friends and family. Whether you’re looking for vibrant colors, creative designs, or troubleshooting tips, these FAQs will help you achieve the best results every time. Happy egg dyeing!
Pin & Share These Ideas for Your Easter Celebrations!
Now that you’re equipped with everything you need to create vibrant, creative, and Pinterest-worthy dyed Easter eggs, it’s time to start crafting your own! From marbled Easter eggs to gold-leaf designs and eco-friendly natural dyes, there’s an easter egg dye technique for every style and skill level.
Don’t forget to pin this post for later, so you can refer to it during your Easter celebrations or share it with family and friends. These DIY Easter egg decorating ideas are perfect for a fun activity at your next Easter egg decorating party or as part of your holiday decor.
Looking for more Easter inspiration? Check out our related posts on Easter Fireplace Decor Ideas For Your Spring mantle and Spring Arts and Crafts: Sustainable DIY Decor to make your spring celebrations even more special! Happy Easter, and may your eggs be as vibrant and unique as your creativity